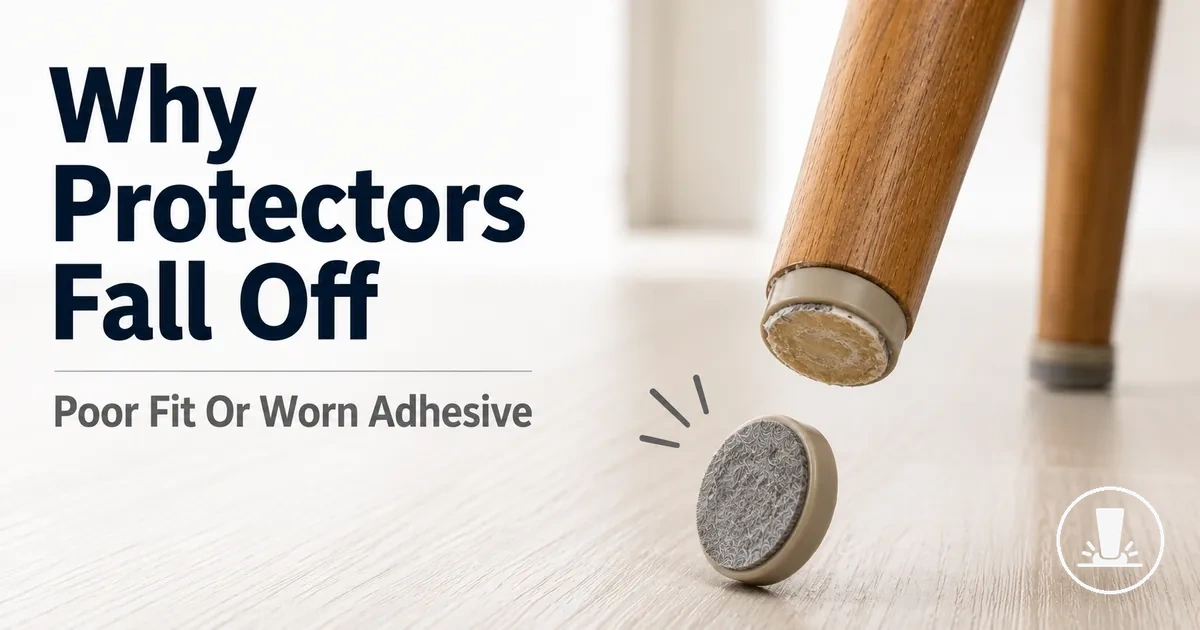
Why Furniture Floor Protectors Fall Off
Furniture floor protectors usually fall off because protector fit, adhesive contact, residue, movement, or wear is no longer supporting a secure attachment. The same symptom can appear with adhesive pads that peel away or slip-on caps that no longer hold their position. The most likely cause depends on the attachment method, furniture legs, and contact conditions.
Furniture floor protectors fall off for more than one reason, which is why a visible detachment does not always point to a single defect. A loose protector may be linked to a weak bond at the contact surface, an incorrect fit against the leg shape, contamination from residue, or repeated movement that stresses the attachment point. In many cases, the visible symptom appears after multiple conditions combine rather than from one isolated issue. Understanding the cause group helps narrow the diagnosis before any refitting or replacement decision.
The reasons furniture floor protectors fall off can be grouped into a few common attachment-related categories:
- Adhesive pads losing contact because of incomplete surface contact, residue, pressure loss, or a weak bond.
- Slip-on caps becoming loose because leg shape, inner diameter, friction, or fit no longer match.
- Furniture legs creating attachment challenges through size, bottom-surface flatness, or uneven contact.
- Movement, weight, floor friction, twisting, and repeated stress increasing the chance of detachment.
- Worn protectors showing replacement cues such as compressed felt, stretched caps, or repeated loosening.
Adhesive pads and slip-on caps use different attachment systems, so they often fail in different ways. Adhesive pads rely on contact surface quality and bond strength, while slip-on caps depend more on fit, friction, and leg geometry. A protector that does not stay on because of adhesive failure differs from one that comes loose because of fit failure. For that reason, the fix should match the failure type rather than the symptom alone.
No single method can address every case where furniture floor protectors come loose. A stronger adhesive may not help when the issue is poor fit, and a tighter cap may not solve a problem caused by wear or residue. Safe replacement or refitting decisions work best when they follow the actual attachment condition rather than a one-size-fits-all approach.
What Keeps a Furniture Floor Protector Attached
A furniture floor protector stays attached when its holding method matches the furniture leg and the contact conditions around it. Attachment is created through the interaction of protector type, leg surface, contact area, friction, pressure, and movement rather than any single factor alone. The main attachment variables are protector type, contact area, pressure, friction, and use context.
What keeps a furniture floor protector attached can be understood through the conditions that support surface bond, mechanical fit, and resistance to movement stress. The image below illustrates how contact area, pressure, and holding method work together to support attachment.
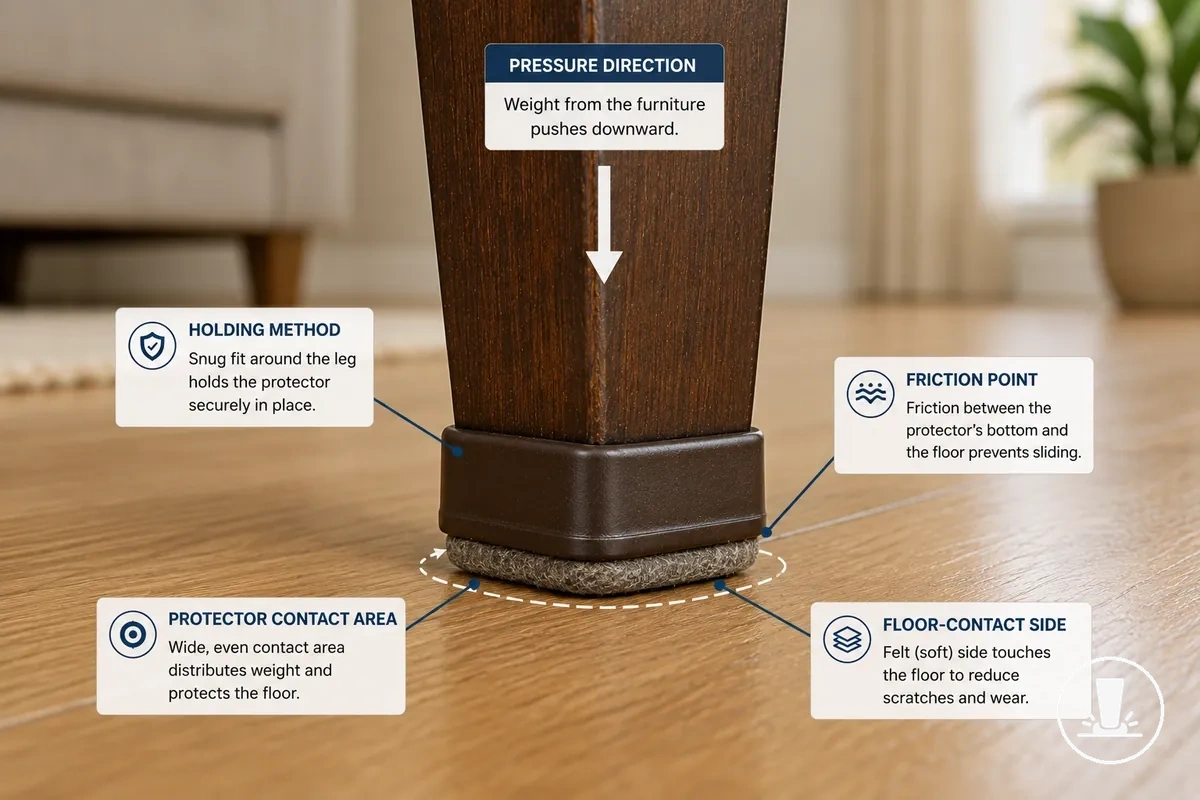
- Surface bond relies on contact area, pressure, and the condition of the leg surface.
- Mechanical fit relies on friction, inner fit, and the holding method used by the protector type.
- Movement stress is affected by weight, floor friction, and repeated use.
- Attachment is strongest when contact conditions support both bond and fit.
Adhesive pads, slip-on caps, and pressure-based designs use different holding methods to stay attached. An adhesive pad relies more on surface bond and pressure across the contact area, while a slip-on cap relies more on friction, tension, and fit around the furniture leg. Pressure-based attachment can be limited by leg surface flatness and movement during use. In this article, furniture floor protectors refers to the floor-contact components that help maintain attachment between furniture legs and the floor.
Stronger adhesive strength alone is not always the reason a furniture floor protector stays on. Attachment can also be affected by fit, friction, protector condition, and movement during use. Attachment strength is strongest when the holding method matches the leg shape and use context.
Main Causes of Furniture Floor Protectors Falling Off
When furniture floor protectors are falling off, the main causes are usually related to adhesive failure, fit failure, surface condition, movement, or protector wear. A loose protector may peel, slip off, detach, or come loose for different reasons even when the symptom appears similar. Symptoms should be matched to conditions before selecting a likely check.
Peeling, sliding, and loosening often point to different cause groups and may require different checks. Adhesive failure can be associated with residue or a weak bond, while fit failure can be linked to furniture leg shape, cap size, or reduced friction. Movement, weight, and twisting may also contribute to repeated detachment. The table below organizes the main causes of furniture floor protectors falling off by symptom, cause group, check, and meaning.
| Symptom | Likely cause group | What to check | What it means |
|---|---|---|---|
| Peeling adhesive pads | Adhesive failure | Residue, contact condition, weak bond | The adhesive pad may no longer maintain reliable surface contact. |
| Sliding slip-on caps | Fit failure | Furniture leg shape, cap size, friction | The protector may not be gripping the furniture leg securely. |
| Repeated detachment | Worn protector | Protector condition and replacement signals | The attachment system may be showing signs of wear. |
| Failure after residue buildup | Surface-condition issue | Residue between the protector and furniture leg | Surface contamination may interfere with attachment. |
| Loosening during use | Movement-related stress | Weight, friction, twisting, movement pattern | Repeated movement may be contributing to detachment. |
Poor Adhesive Contact
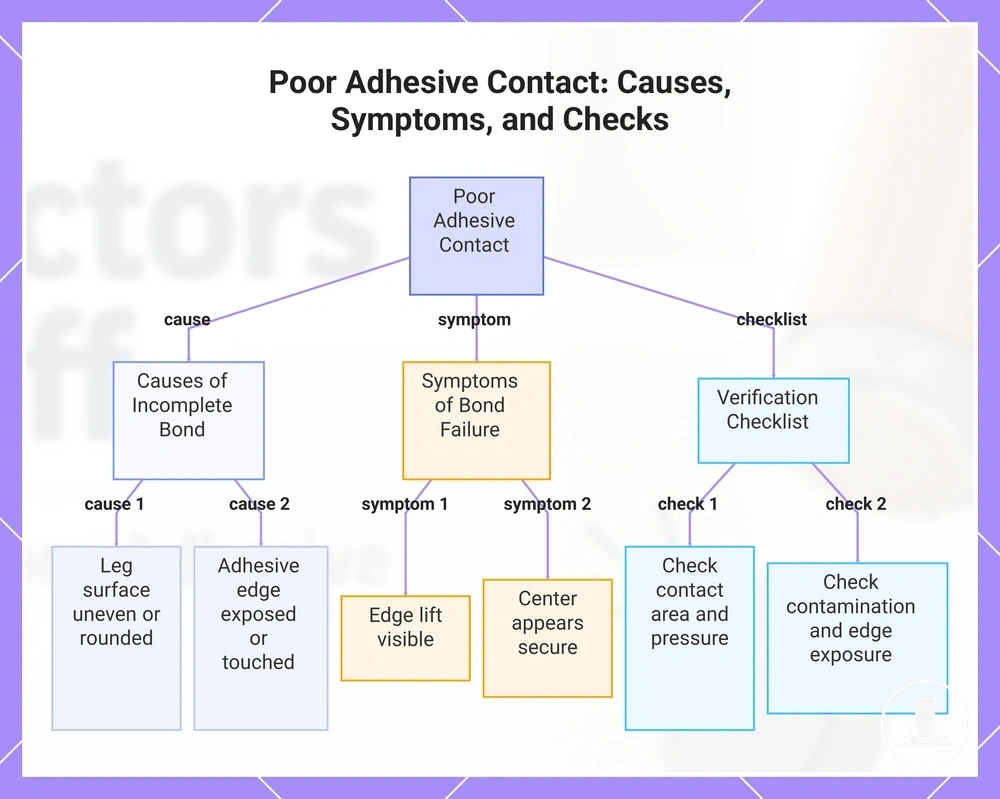
When an adhesive pad peels off or detaches, poor adhesive contact is often a cause because the bond is incomplete. An adhesive pad can lose grip when it cannot maintain stable contact with the furniture leg. The main contact variables are contact area, pressure, surface texture, and application condition.
A rounded leg bottom, uneven flatness, exposed adhesive edge, or touched adhesive backing can reduce contact and make detachment more likely. An adhesive pad may also show edge lift when only part of the contact area is bonded, even if the center initially appears secure. Residue, movement, or worn adhesive can contribute to adhesive failure, but incomplete contact remains a separate signal. The checklist below helps verify whether poor adhesive contact is causing the bond to be incomplete.
Poor adhesive contact can be checked through the following local conditions:
- Surface flatness allows the adhesive pad to contact the furniture leg evenly.
- Pad size provides enough contact area without leaving unsupported edges.
- Pressure is distributed across the adhesive surface rather than concentrated in one area.
- Adhesive contamination from touched adhesive, oils, or residue has not reduced stickiness.
- Edge exposure is not creating visible edge lift before full detachment.
This chart explains the causes and symptoms of poor adhesive contact and provides a verification checklist to diagnose the issue.
Small, Rounded, or Uneven Furniture Leg Bottoms
Small, rounded, or uneven furniture leg bottoms can reduce contact area or grip, which may make a protector harder to hold securely. Leg shape, bottom flatness, and size can affect how an adhesive pad or cap interacts with the furniture leg. Repeated failure under similar conditions can be a sign of a geometry-related fit risk.
Flat furniture leg bottoms usually provide more consistent contact, while a rounded leg bottom may leave less contact area and increase the chance of peeling near the edges. An angled leg or uneven furniture leg can create uneven pressure that may contribute to twisting or detachment. A small leg bottom or narrow leg may also increase the chance of a loose fit or cap slippage when grip is limited. The comparison below shows how geometry changes contact and fit, and repeated failure may indicate a condition that warrants a closer look at chair leg protector fit.
| Leg-bottom condition | Why the protector may fail |
|---|---|
| Flat bottom | Usually provides more even contact area and support. |
| Rounded leg bottom | May reduce contact area and increase edge-related peeling. |
| Angled bottom | Can create uneven pressure that contributes to twisting. |
| Small or narrow leg | May increase looseness or cap slippage when grip is limited. |
| Uneven furniture leg | Can create pressure points that affect holding stability. |
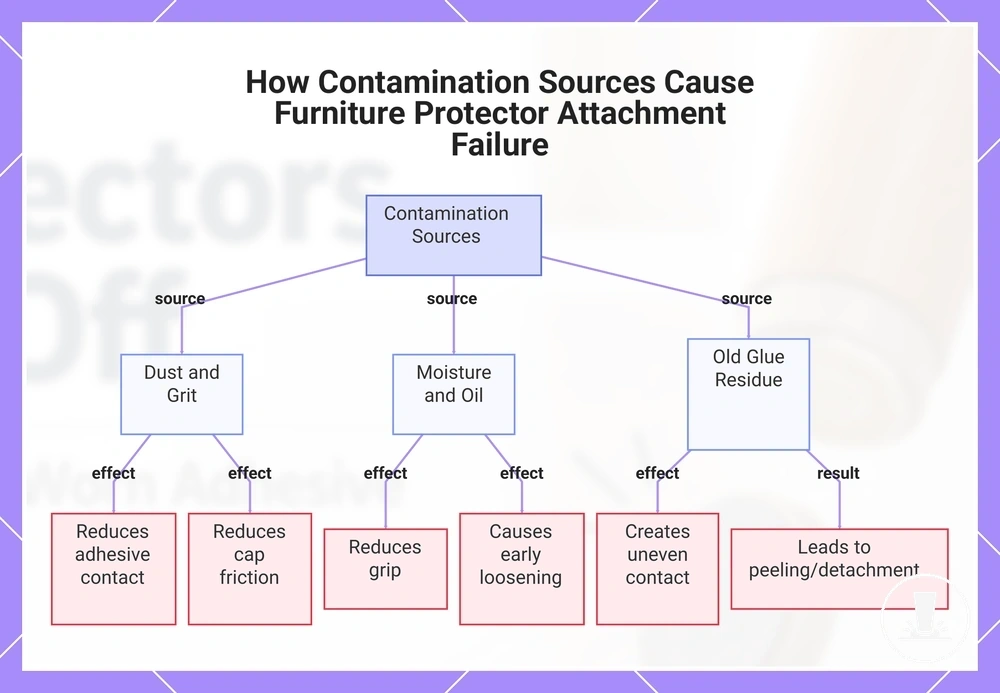
Dirt, Moisture, Oil, or Old Glue Residue
Dirt, moisture, oil, or old glue residue can block adhesion or friction between a protector and the furniture leg surface. This contamination may reduce adhesive contact, reduce cap friction, or contribute to early loosening. Common contamination sources include dust, grit, moisture, oil, and old glue residue.
Reused pads, recently polished furniture, and pads applied over old residue can create hidden attachment failures. A surface film or sticky buildup may interfere with contact, while dust inside a cap may reduce friction and contribute to slippage. Old glue residue can create uneven contact that increases the chance of peeling or detachment. Cleaning may help when contamination is the active cause, but fit, movement, or wear may still contribute to failure.
Dirt, moisture, oil, or old glue residue can affect attachment through the following cause-and-effect relationships:
- Dust or grit on the furniture leg surface can reduce adhesive contact and contribute to a weak bond.
- Moisture or a surface film may reduce grip and increase the chance of early loosening.
- Oil or furniture polish can interfere with contact and contribute to reduced adhesion.
- Old glue residue can create uneven contact that may lead to peeling or detachment.
- Dust inside a cap can reduce friction and contribute to slippage or a loose fit.
This chart shows the main types of contamination that affect contact between a protector and furniture leg, and the specific attachment problems they cause.
Movement, Weight, Rugs, and Floor Friction
Movement, weight, rugs, and floor friction can pull a protector sideways even when it was fitted correctly. Repeated stress at the attachment point may create twisting, shearing, compression, or gradual detachment over time. The effect depends on sliding frequency, load, floor texture, rug drag, and force direction.
A chair that is moved repeatedly may place more stress on a protector than furniture that remains mostly static. Repeated movement can increase rubbing and side force, while weight adds pressure that may compress a pad or increase attachment stress. Rugs and floor friction can also change how force is transferred to the protector during movement. When sliding, drag, or pressure occurs frequently, stress-related failure may become more likely.
Movement, weight, rugs, and floor friction can create the following stress patterns that pull protectors loose:
- Repeated sliding can create side force that contributes to twisting and detachment.
- Higher load can increase pressure and compression at the attachment point.
- Rug drag may increase resistance and contribute to cap slippage or shearing stress.
- Rough floor texture can increase rubbing and place additional stress on adhesive contact.
- Frequent chair movement may create earlier attachment wear than occasional movement.
Adhesive Pads and Slip-On Caps Fail in Different Ways
Adhesive pads and slip-on caps fail in different ways because adhesive pads rely on surface bond and contact area, while slip-on caps rely on fit, elasticity, and friction. Bond-related problems often lead to peeling, while fit-related problems are more likely to result in looseness or sliding off. Identifying the failure type first can help avoid applying the wrong fix.
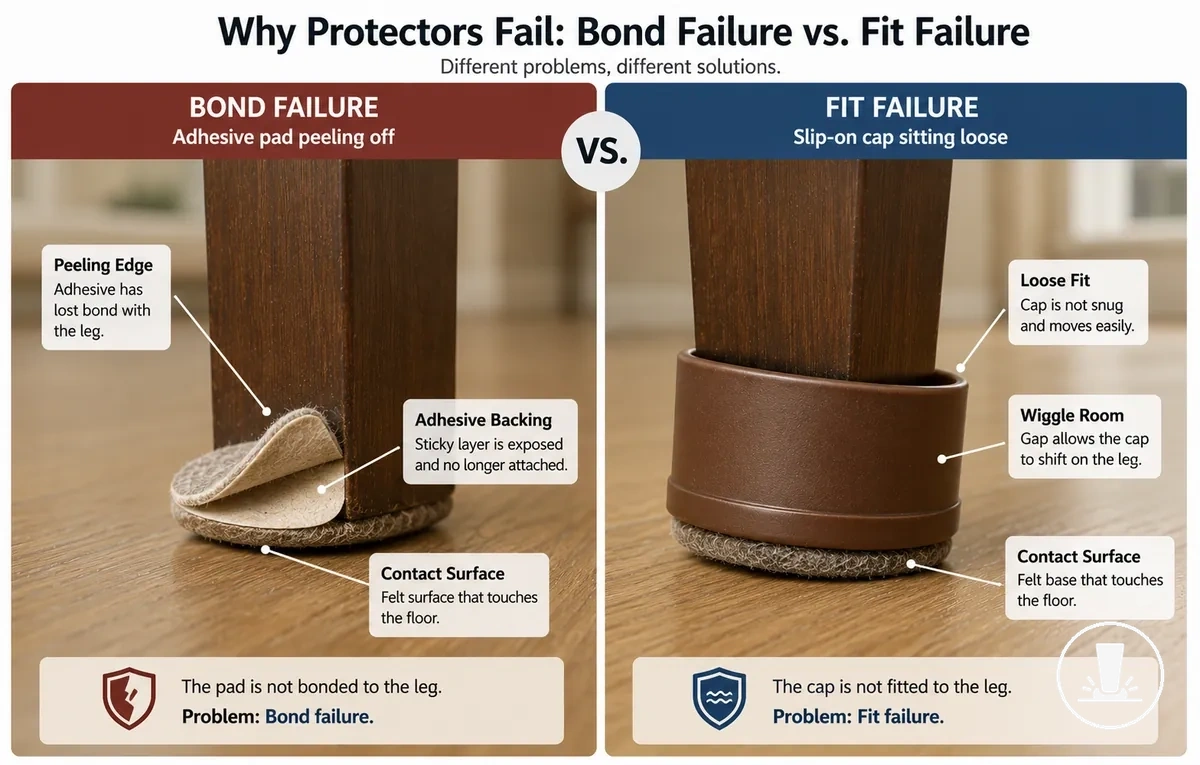
Adhesive pads and slip-on caps fail in different ways, and the visible symptom often points to the holding mechanism involved. Peeling, edge lift, residue, or reduced contact area may indicate a surface bond issue. Cap looseness or sliding off may indicate a fit-related issue involving size, elasticity, friction, or chair leg shape. Symptoms can overlap when movement, residue, or sizing conditions combine, but the distinction helps prevent the wrong fix and leads naturally into a broader attachment method comparison.
Adhesive pads and slip-on caps fail in different ways because the table below compares holding mechanisms and failure symptoms.
| Protector type | What holds it on | Common failure symptom | What to check first |
|---|---|---|---|
| Adhesive pads | Surface bond and contact area | Peeling, edge lift, or bond failure | Contact area, residue, and adhesive condition |
| Slip-on caps | Size, elasticity, and friction | Cap looseness or sliding off | Cap size, inner fit, and chair leg shape |
Stick-On Felt Pads Losing Their Bond
Stick-on felt pads lose bond when the adhesive backing can no longer maintain contact under use conditions. A weak adhesive bond may lead to edge lift, sliding, sticky residue, or a missing pad. The main checks are adhesive backing condition, pad size, leg-bottom texture, and movement load.
Peeling felt pads, sticky residue on a furniture leg, or a missing pad can indicate that contact between the adhesive backing and the leg surface has been reduced. Pad size, leg-bottom texture, residue, or repeated movement load may contribute to a weak bond and gradual detachment. When a small or rounded leg bottom provides limited contact area, a different attachment type may offer a safer fit than relying on additional adhesive.
Stick-on felt pads losing their bond can be verified with the following checklist for adhesive-backed felt pad failure:
- Check whether the adhesive backing still maintains consistent contact with the leg bottom.
- Check whether pad size provides enough contact area without unsupported edges.
- Check whether leg-bottom texture is contributing to edge lift or uneven contact.
- Check whether movement load is contributing to sliding, peeling, or detachment.
- Check for sticky residue or a missing pad as signs of a weakened bond.
Slip-On Chair Leg Caps Becoming Loose
Slip-on chair leg caps become loose when tension and friction no longer match the furniture leg. A slip-on chair leg cap relies on fit rather than adhesive to stay in place. The main variables are inner diameter, leg shape, material stretch, and repeated use.
A common misconception is that cap slippage is an adhesive problem, but slip-on caps depend on friction and tension inside the sleeve. Dust inside the sleeve, changes in leg shape, material stretch, or movement may reduce grip and lead to wobble, rotation, or a cap that can come off during use. An oversized cap and a stretched cap may show the same symptom, but an oversized cap starts with excess space while a stretched cap may develop looseness after repeated use.
Slip-on chair leg caps becoming loose can be checked through the following fit, tension, and friction conditions:
- Check whether the inner diameter still matches the furniture leg size.
- Check whether leg shape is reducing contact and creating wobble or rotation.
- Check whether dust inside the sleeve may be reducing friction.
- Check whether material stretch from repeated use may be contributing to cap slippage.
How to Keep Furniture Floor Protectors On Longer
Keeping furniture floor protectors on longer requires matching the fix to the failure cause before making changes. A protector that fails because of surface contamination may need a different maintenance action than one affected by leg size, protector type, movement frequency, or attachment strength. Prevention is usually more effective when the fitting choice matches the condition causing the failure.
If the issue is related to residue, cleaning and refitting may be the appropriate next move. If repeated detachment is linked to leg size or shape, resizing may be more suitable. When movement frequency is high or attachment strength has declined because of wear, a different attachment method or maintenance action may be more appropriate. The steps below show how to keep furniture floor protectors on longer by organizing actions around the failure cause.
- If the contact surface is dirty or contaminated, clean the contact surface and allow it to remain dry before refitting. This may improve adhesion or friction, but results can still depend on surface condition and wear.
- If repeated detachment appears related to leg size or shape, check protector fit and resize when needed. A closer fit may help, but outcomes can depend on furniture-leg geometry.
- If the protector type does not suit the attachment condition, consider a different fitting choice or change attachment method. Suitability can vary by contact area and use conditions.
- If movement frequency is high, inspect whether repeated sliding or twisting is increasing stress at the attachment point. A stronger attachment approach may help in some situations, but effectiveness depends on use patterns and floor conditions.
- If attachment strength has declined because of wear, inspect for replacement cues before refitting. A worn protector may continue to detach even after other maintenance actions.
This chart shows the three main failure causes for furniture floor protectors and the specific actions to address each cause.

Prepare the Contact Surface Before Fitting
Surface preparation improves adhesion or friction only when contamination is part of the problem. A contact surface that is clean and dry may reduce interference from residue, moisture, or handling-related contamination. The goal before fitting or refitting is to create a clean and dry contact condition.
Dust, grease, moisture, and old adhesive can interfere with contact and contribute to weak adhesion, reduced friction, or early failure. Surface preparation focuses on removing these local barriers rather than correcting sizing or wear-related issues. When the furniture material is uncertain or may have a sensitive finish, test any cleaner on a small area first before broader use.
To prepare the contact surface before fitting, use the steps below to reduce residue and moisture before the protector is applied:
- If dust or loose debris is present, remove it from the leg surface or cap surface before fitting. This may improve contact when contamination is contributing to the problem.
- If grease, oils, or handling residue are present, clean the contact surface and remove the residue. Reduced surface contamination may help improve adhesion or friction.
- If old adhesive is creating an uneven surface, remove loose residue before refitting. Residue removal may help reduce peeling associated with poor contact.
- If moisture is present after cleaning, allow adequate drying time before applying the protector. Dry contact may help reduce early failure linked to trapped moisture.
- If the protector includes an adhesive surface, avoid unnecessary handling of the adhesive area before application. Touched adhesive may collect oils that can reduce bond quality.
Match the Protector to the Leg Size and Shape
Matching size and shape helps prevent loose caps, peeling pads, and repeated attachment failure. A poor match between the protector and the furniture leg can reduce contact area or holding force. The goal is to match the protector to the leg size and shape with sufficient fit accuracy.
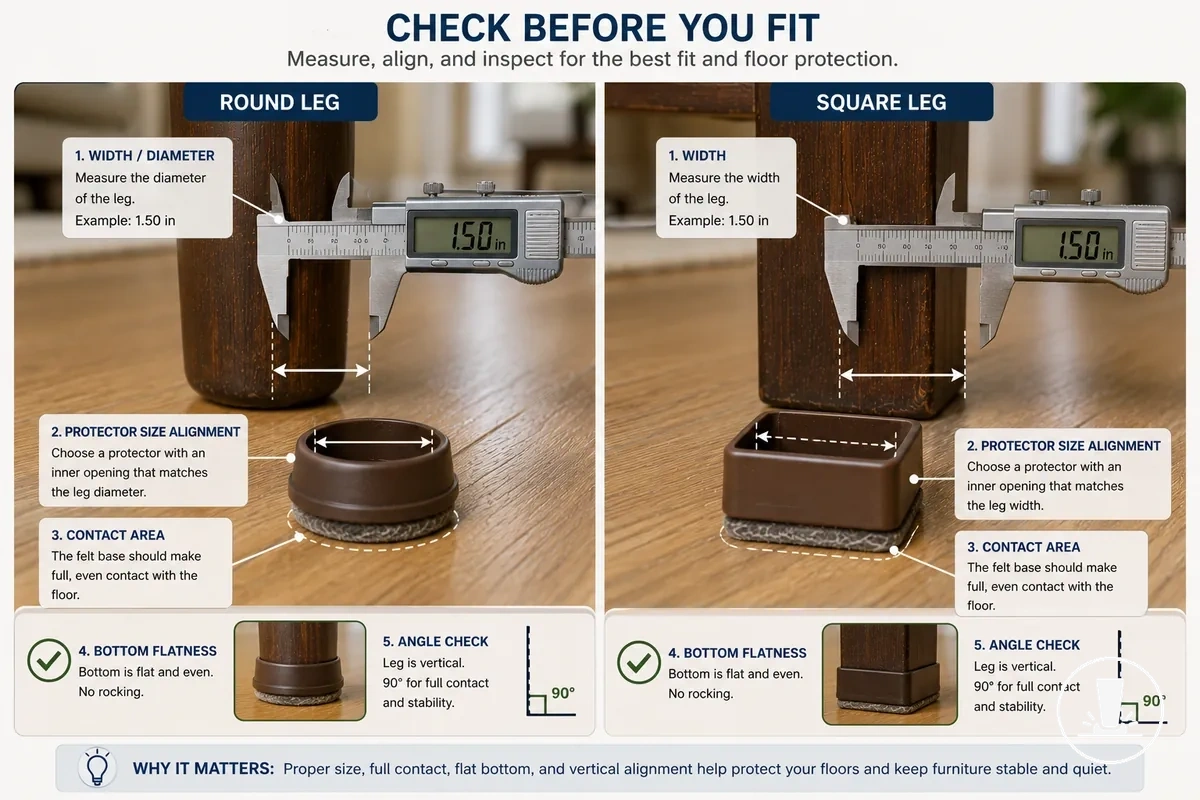
When a furniture leg has a different width, diameter, leg shape, bottom flatness, or angle than the protector expects, protector fit may be reduced. Match the protector to the leg size and shape by checking the fit factors that influence contact area, holding force, and attachment suitability before refitting or replacing. If repeated failure continues despite clean contact, it may be appropriate to measure furniture legs as a sizing check.
The checklist below verifies local fit factors before refitting or replacing a protector:
- Check whether leg width or diameter aligns with the selected pad size or cap size.
- Check whether leg shape matches the protector fit for the furniture leg.
- Check whether bottom flatness provides enough contact area for the protector to sit evenly.
- Check whether the leg angle creates uneven pressure that may contribute to slippage or peeling.
- Check whether attachment suitability is limited by a size match issue rather than a contact-surface issue.
Use a Stronger Attachment Method for Repeated Movement
Repeated movement may require a different attachment method when the same protector continues to loosen or detach. Reusing the same solution can lead to the same failure pattern if movement stress remains unchanged. The decision should be based on how the holding method responds to repeated movement.
A stronger attachment method depends on movement stress, leg shape, and floor risk rather than on generic quality claims. Adhesive options rely on a surface bond and may be affected by movement stress when contact conditions are limited. Slip-on designs depend on friction and leg shape, while nail-on, tap-on, and glide-style holding methods use different attachment approaches with varying suitability for frequent movement. The attachment method should still protect the floor and fit the leg, not only resist falling off.
Use a stronger attachment method for repeated movement by comparing attachment choice against movement stress and fit:
- Adhesive holding methods may suit conditions where a surface bond remains stable and peeling risk is limited.
- Slip-on holding methods depend on leg shape, friction, and protector fit to maintain a more secure hold.
- Nail-on or tap-on holding methods may be considered when repeated movement continues to challenge other attachment choices, subject to floor risk and leg compatibility.
- Glide-style options combine floor-contact function with a holding method, and suitability depends on movement patterns and fit.
- If repeated movement continues to cause failure, attachment suitability should be evaluated alongside leg shape, floor risk, and protector type.
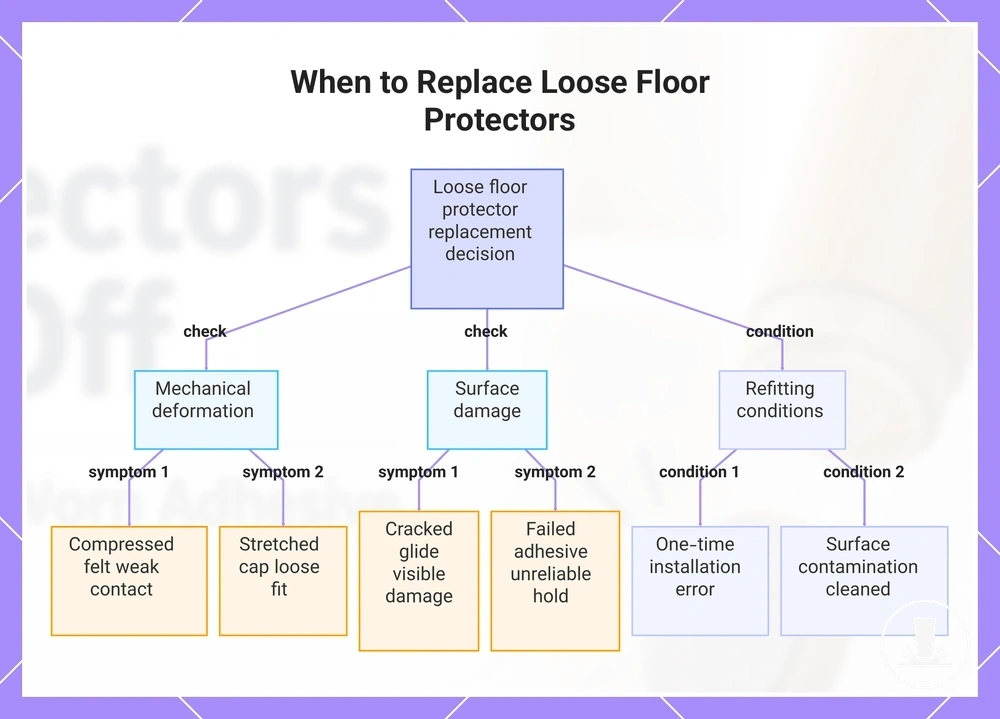
When Loose Floor Protectors Should Be Replaced
Loose floor protectors should be replaced when wear or repeated detachment makes reattaching unreliable. Worn materials and failed adhesive can reduce holding ability even after refitting. The decision should be based on the protector condition rather than on repeated reattachment attempts.
If a protector came loose because of a one-time installation issue or surface contamination, refitting may still be reasonable after the underlying issue is corrected. If repeated detachment continues despite clean contact and appropriate fitting, wear or mismatch may be contributing to the problem. Compressed felt can create weak contact, a stretched cap can create a loose fit, and a cracked glide is a visible sign of a damaged protector. After the replacement cues below are considered, it may be appropriate to replace worn protectors when refitting is no longer reliable.
When loose floor protectors should be replaced, the checklist below helps separate refitting from replacement:
- Compressed felt is creating weak contact and contributing to repeated detachment.
- A stretched cap has developed a loose fit and continues to slip during use.
- A cracked glide shows visible damage that may increase floor-contact risk.
- Failed adhesive or contaminated adhesive leaves residue and reattaching no longer provides a reliable hold.
- Exposed edges continue to peel after refitting attempts.
- Repeated detachment continues even after contact surfaces are cleaned and fit issues are checked.
- A different attachment choice may be more appropriate when wear or mismatch continues to create the same failure pattern.
This chart shows when to replace loose floor protectors based on wear indicators and refitting conditions.
What to Avoid When Reattaching Loose Floor Protectors
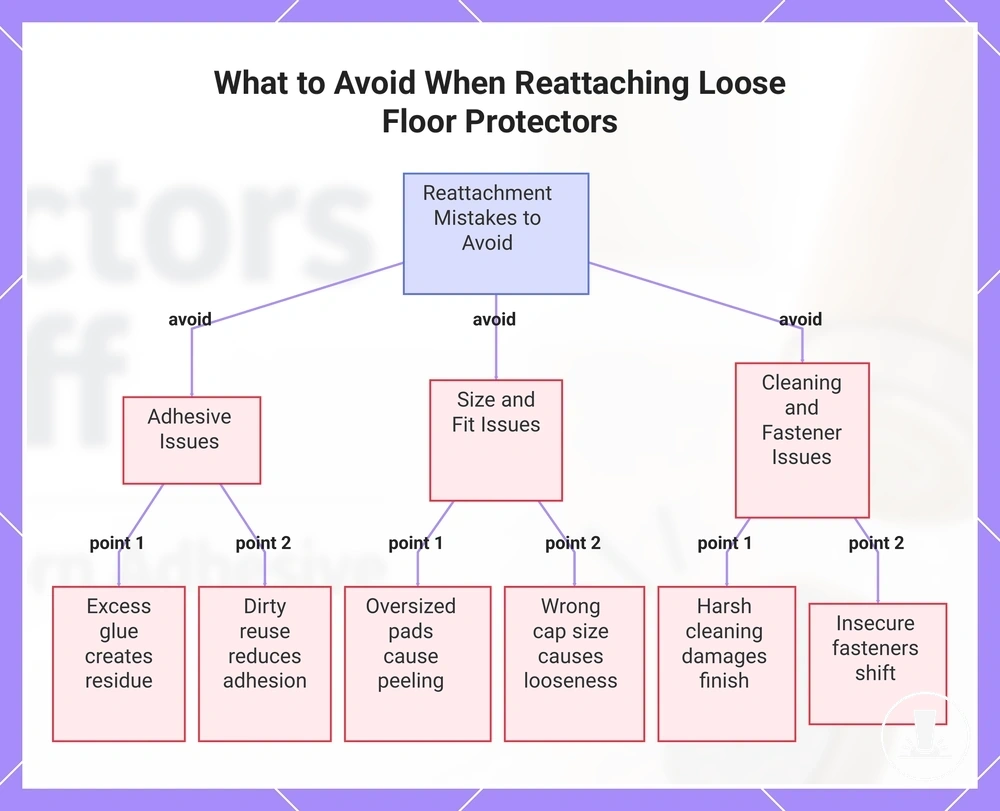
Unsafe or mismatched reattaching loose floor protectors can make them fail again. Quick fixes may create new failure points by reducing fit, contact quality, or floor-contact performance. The safest approach is to match the fix to the failure cause.
A common myth is that more holding force automatically creates a better result. In practice, excess glue, dirty reuse, or oversized pads can introduce residue, uneven contact, peeling, or renewed detachment. Wrong cap size and insecure fasteners can also create looseness or slipping instead of improving attachment. A safe fix should preserve both fit and the protector's floor-contact function.
What to avoid when reattaching loose floor protectors is summarized in the checklist below to help prevent fixes that create new failure points:
- Avoid: Using excess glue when residue or uneven contact may contribute to renewed detachment.
- Avoid: Dirty reuse when old glue, dust, or contamination may reduce adhesion and increase the chance of falling off again.
- Avoid: Oversized pads that create exposed edges, poor fit, or peeling.
- Avoid: A wrong cap size that can contribute to looseness, slipping, or repeated failure.
- Avoid: Harsh cleaning on a sensitive finish when a gentler approach may be more appropriate.
- Avoid: Insecure fasteners that may shift, loosen, or create an unreliable attachment.
This chart lists the key mistakes to avoid when reattaching loose floor protectors to prevent creating new failure points.