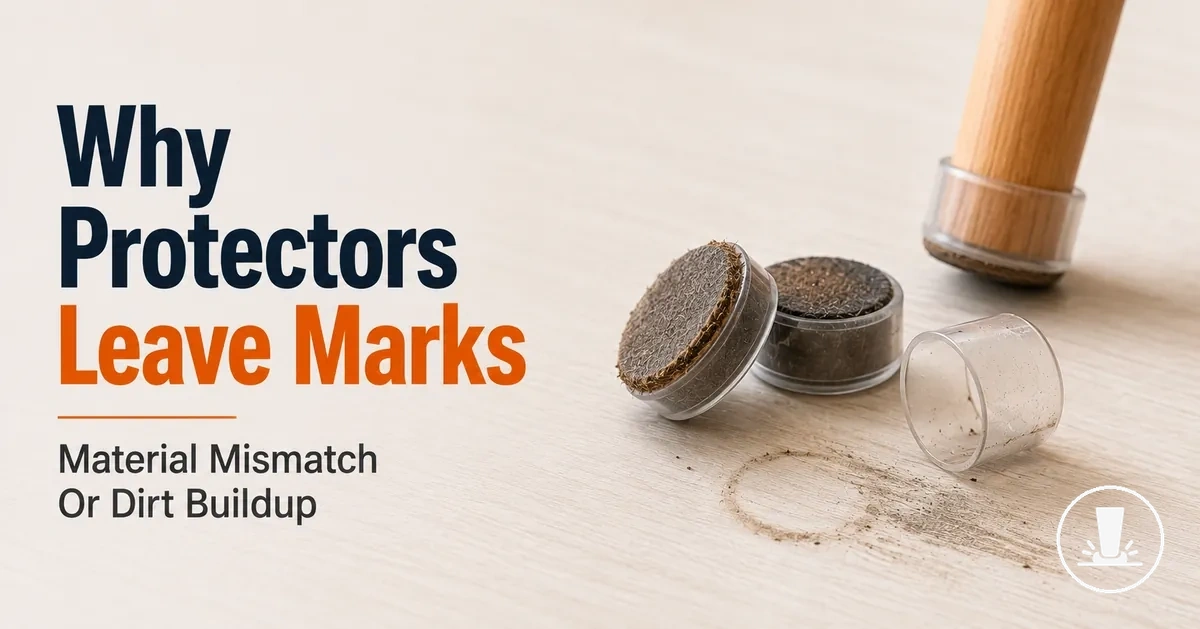
Why furniture floor protectors leave marks on floors
Furniture floor protectors can leave floor marks when residue, material transfer, trapped dirt, adhesive exposure, pressure, movement, or floor-finish interaction affects the contact point between the protector and the floor surface. Furniture floor protectors may create visible marks as protector materials wear, collect debris, or react differently to a floor finish over time. The type and severity of the mark depend on the protector material, the floor surface, and the condition of both.
Furniture floor protectors are the repeated floor-contact point between furniture and the floor surface. Because they remain under furniture during daily use, they can collect trapped dirt, compress under weight, or expose worn contact materials. Rubber pads, felt pads, and other floor protectors may interact differently with a floor finish depending on movement and maintenance conditions. For a broader overview of protector types and uses, see furniture floor protectors.
Visible floor marks are often diagnosable symptoms rather than proof of a single problem. Residue may appear as a sticky film from worn pads or exposed adhesive, while material transfer can appear as stains, smears, or discoloration when protector materials interact with a floor surface. Trapped dirt, dirt buildup, or grit beneath felt pads can create abrasion or scuffs because movement presses particles against the floor. Pressure and furniture weight can also increase mark risk by concentrating contact at a small area. A removable residue mark is different from a mark that may involve the floor finish.
Chairs that slide frequently, tables that shift during use, and heavy furniture that remains in place for long periods can create different floor-mark patterns. Frequent movement may increase friction and expose trapped dirt, while stationary furniture may reveal residue, pressure-related impressions, or material transfer over time. Furniture weight can change how protector pads compress against the floor surface, which may affect the appearance of visible marks. Recognizing these patterns helps guide accurate mark interpretation before assuming a single cause.
What furniture protector marks mean on different floor surfaces
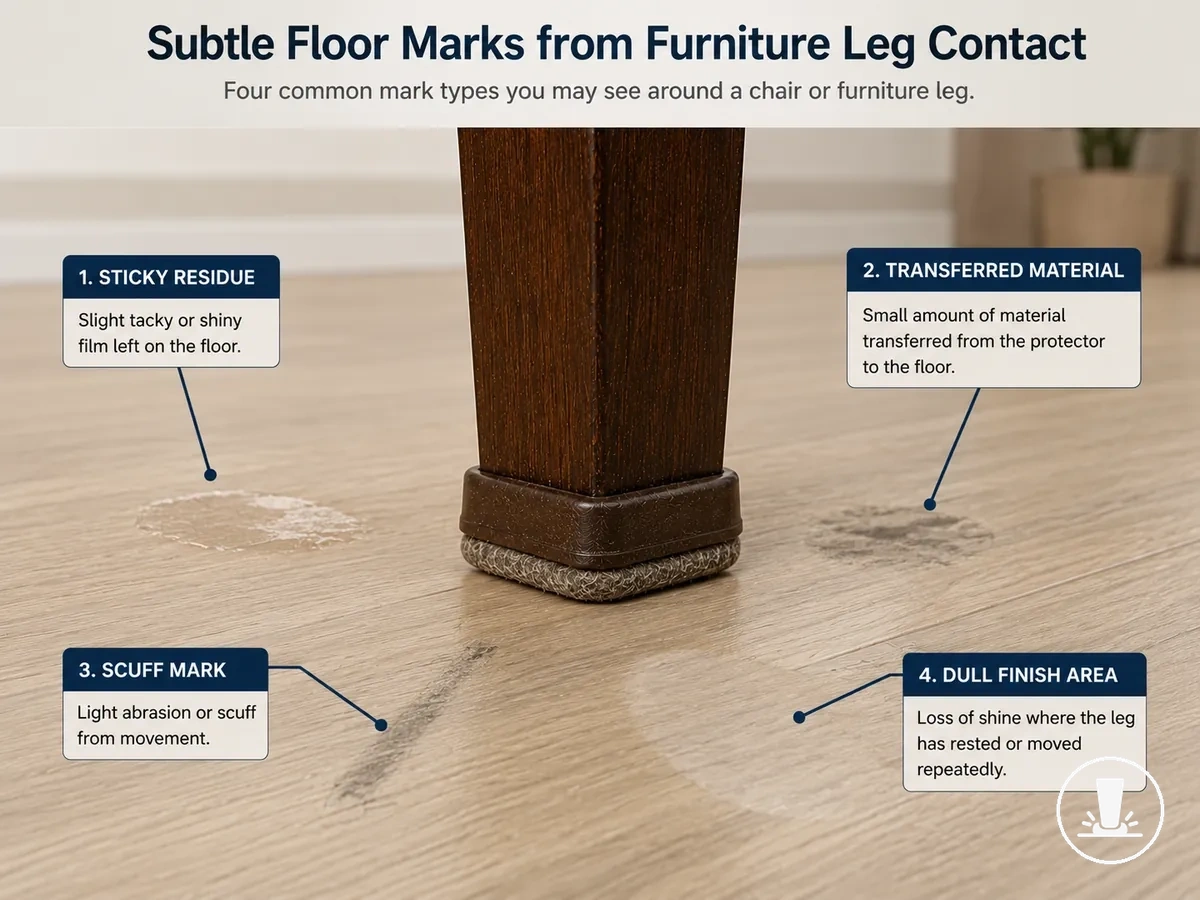
Furniture protector marks are visible changes on a floor surface that can indicate surface residue, transferred material, compression marks, scuffs, stains, or possible finish damage. The meaning of a mark depends on its appearance, how it responds to cleaning, and how it interacts with the floor surface. Mark appearance alone is not enough to determine the exact cause with certainty.
Furniture protector marks can often be grouped into residue, transferred material, scuffing, and possible finish reaction. A removable mark may indicate surface residue or a temporary film left at the contact point. Transferred material can appear as discoloration when protector materials leave visible traces on a floor finish. A scuff or dull patch may reflect abrasion or finish sensitivity rather than simple residue. Comparing mark appearance with its cleaning response can provide a safer starting point for interpretation.
What furniture protector marks mean on different floor surfaces can become clearer when visible mark categories are viewed side by side. The image below highlights common differences between residue, scuffing, and possible finish dulling before a specific cause is assigned.
The comparison block below organizes floor surface, mark appearance, likely meaning, and caution level to support protector-related mark interpretation.
| Floor surface | Mark appearance | Likely meaning | First caution |
|---|---|---|---|
| Smooth finished flooring | Sticky film or residue | Surface residue or protector residue | Low to moderate caution level until removability is checked |
| Finished flooring | Discoloration or stain | Transferred material that may involve the floor finish | Moderate caution level because appearance may remain after cleaning |
| Hard floor surface | Scuff or dull patch | Surface abrasion or finish interaction | Moderate caution level and closer inspection may be needed |
| Any floor surface | Mark that remains after a removable mark is ruled out | Possible finish damage or a deeper surface change | Higher caution level because floor-specific assessment may be required |
A removable mark, transferred material, and possible finish damage represent different interpretation categories. Deeper floor damage may require floor-specific assessment, while this section remains focused on understanding furniture protector marks and their likely meaning across floor surfaces.
Surface marks, residue, stains, and finish damage
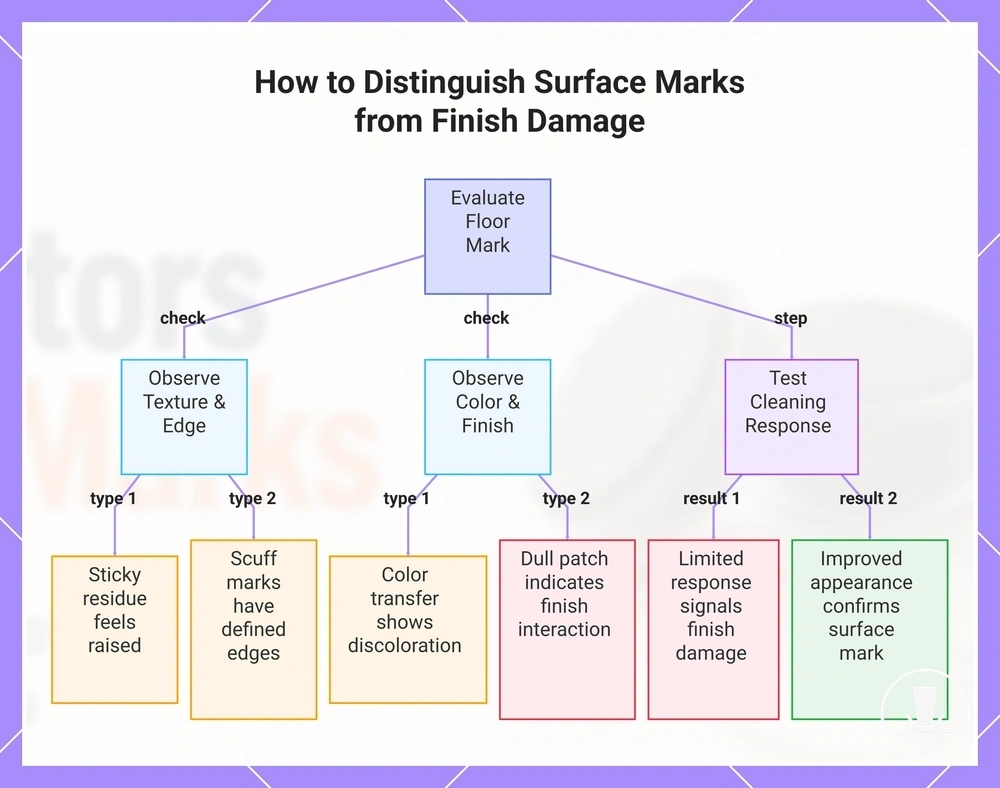
When evaluating a mark, judge it by texture, color transfer, edge shape, dullness, and cleaning response. Surface marks and finish-related marks require different handling because they may affect different layers of the floor surface. Appearance can provide useful clues, but test gently before assuming finish damage.
Mark type changes the safest next action because residue, stains, scuffs, and finish reactions can appear similar at first. Visible clues help distinguish removable surface marks from signs that may involve finish sensitivity, as outlined below.
- Sticky residue or an adhesive smear often feels raised and may respond to mild cleaning.
- Color transfer or stains can appear as discoloration rather than surface buildup.
- Scuff marks often have defined edges and may change appearance after light cleaning.
- A dull patch may indicate finish interaction when texture remains unchanged.
- Limited cleaning response can be a caution signal when dullness or color change persists.
- Finish damage may be involved when visible changes remain after residue is ruled out.
This chart shows how to evaluate floor marks by observing texture, color, and cleaning response to determine if the mark is a removable surface issue or a sign of finish damage.
Common causes of furniture pad marks
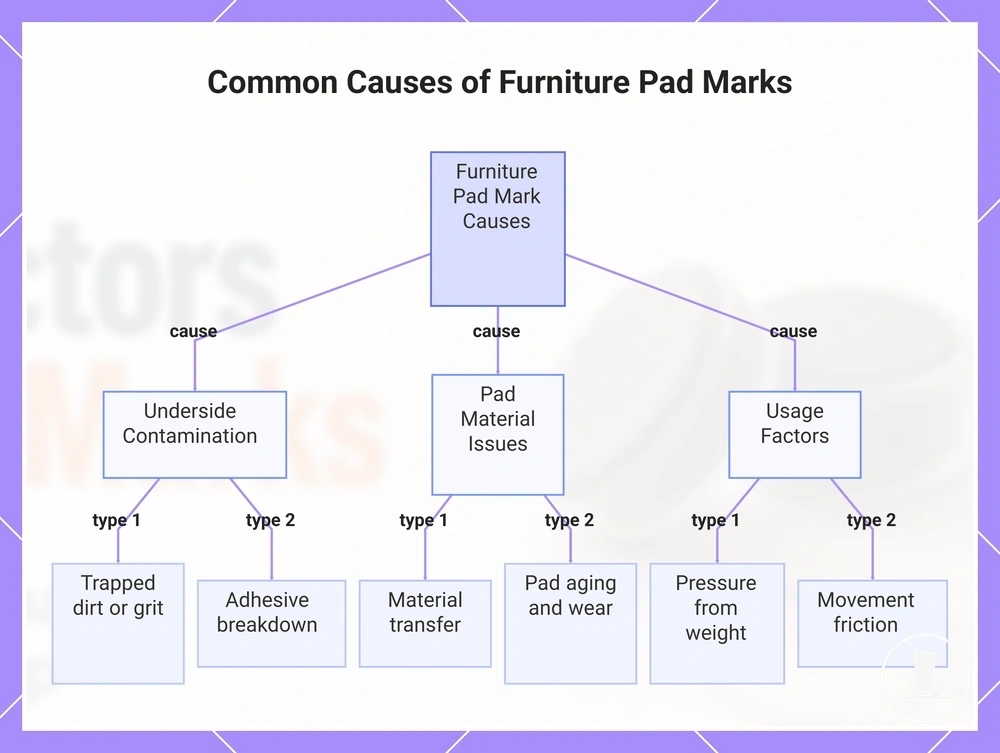
When furniture pad marks appear, the most common causes are trapped dirt, adhesive breakdown, material transfer, pressure, movement, and floor compatibility issues. Furniture pad marks can develop when pad condition changes over time or when the contact point between the pad and the floor surface is affected by use. Similar marks can have different causes, so appearance alone is not enough for an exact diagnosis.
Identifying the cause starts with inspecting the pad underside and the floor contact point. Pad age, underside cleanliness, adhesive condition, protector material, and floor finish can all influence mark appearance. A worn pad may create a different mark outcome than a clean pad, even when the visible mark looks similar. The checklist below helps separate likely causes based on pad condition and visible clues.
- Trapped dirt or grit: Scratch-like marks or abrasion may suggest debris between the pad and the floor surface.
- Adhesive breakdown: Sticky residue, smears, or dark edges may indicate deterioration at the pad contact point.
- Material transfer: Discoloration or staining may suggest interaction between the protector material and the floor finish.
- Pad age: Flattened, hardened, or worn furniture pads may produce a different mark pattern than newer pads.
- Pressure from furniture weight: Dull patches or compression-related marks may be associated with concentrated load.
- Movement frequency: Repeated sliding and friction may create scuffing or directional mark patterns.
A frequently moved chair may show friction-related marks because repeated movement changes the contact pattern over time. A table that remains mostly stationary may show localized pressure effects instead. Heavy furniture can create different visible outcomes than lighter furniture because the contact area experiences different levels of pressure. These usage patterns can help connect a mark pattern to a likely cause category.
Furniture pad marks are easier to diagnose when pad condition, furniture weight, movement frequency, underside cleanliness, adhesive condition, protector material, and floor finish are evaluated together. Cause-to-condition analysis is usually more reliable than relying on a single visual clue before attempting removal or replacement.
This chart shows the main categories of causes behind furniture pad marks, grouped by contamination, material issues, and usage factors.
Dirt and grit trapped under the protector
Dirt, grit, and other debris trapped under a protector can create abrasion, dulling, dark smears, or scratch-like trails even when the protector material is suitable for the floor surface. Particles on the protector underside can become pressure points when furniture moves across the floor. Debris is a common cause of marks, but it is only one possible cause of protector-related floor marks.
A frequently moved chair often exposes this issue faster because chair movement repeatedly presses debris against the floor surface. Increased furniture movement can increase debris pressure and make visible mark patterns easier to notice. The same particles may remain unnoticed for longer under stationary furniture because there is less repeated contact movement. For routine upkeep of the contact surface, see clean furniture floor protectors.
Dust, sand, hair, and floor cleaner residue can collect at the protector contact point and affect protector underside cleanliness, which may increase abrasion risk or contribute to visible marks.
- Dust and fine dirt can increase abrasion risk when trapped beneath the protector.
- Sand and coarse grit may contribute to scratch-like trails when furniture movement occurs.
- Hair and small particles can collect around debris and increase underside buildup.
- Floor cleaner residue can create sticky buildup that may contribute to dark smears.
- Debris on the protector underside can increase visible mark formation when movement and pressure occur together.
Adhesive residue from worn or loose pads
Adhesive residue often appears as a sticky film, dark edges, or smeared patches near the furniture leg footprint. Adhesive residue can develop when worn pads or loose pads allow glue to soften, shift, or separate from the pad backing. Pad age and looseness can increase the likelihood of visible residue around the contact area.
Worn adhesive can behave differently under pressure and movement, which may make residue easier to identify during inspection. Checking pad edges and exposed adhesive areas can help determine whether a mark is related to adhesive residue. Adhesive residue usually appears as a surface film, while rubber transfer may appear as a different type of discoloration. Before attempting removal, use a spot-test approach because results can depend on the floor finish and its condition.
- Pad age can increase residue risk when the adhesive layer begins to weaken.
- Loose pads may create smeared patches when movement shifts exposed adhesive across the floor surface.
- Adhesive softness can increase when floor temperature affects the glue layer.
- Cleaning chemical exposure may change adhesive behavior and increase residue risk in some situations.
- Dark edges around the leg footprint can suggest adhesive migration from worn pad backing.
Adhesive residue identification is more reliable when pad condition, adhesive exposure, movement, and floor finish are evaluated together. Safe residue removal depends on the floor material and finish condition, so cautious testing is advisable before using stronger cleaning methods.
Pressure, movement, and furniture weight
Pressure, movement, and furniture weight can turn a minor protector issue into a visible mark because heavier loads and repeated sliding increase compression, friction, heat, and debris grinding at the contact point. Furniture weight concentrates pressure within the contact area, while movement increases surface interaction over time. Mark severity can vary based on contact conditions, floor finish, pad thickness, and the presence of debris.
A chair that moves frequently may show drag marks or pressure marks sooner than furniture that rarely shifts because repeated sliding increases friction at the same contact area. Mark risk changes with furniture behavior and contact conditions, and the table below organizes common use patterns and contact-area risk.
| Furniture behavior | Contact condition | Possible mark effect | Safer check |
|---|---|---|---|
| Repeated sliding | Higher friction and debris grinding | Scratch-like trails or drag marks may appear | Inspect the contact point for trapped debris |
| Heavy stationary load | High compression in a small contact area | Pressure marks or dull patches may develop | Check pad condition and contact coverage |
| Frequent repositioning | Repeated movement across the floor finish | Visible wear patterns may become more noticeable | Look for uneven pad wear |
| Narrow leg shape | Concentrated load on a limited contact area | Mark risk may increase under pressure | Compare contact area and mark location |
The table organizes behavior and contact-area risk through condition-to-effect relationships. Furniture weight, leg shape, pad thickness, sliding frequency, and floor finish resilience can influence whether compression and friction become visible marks under specific contact conditions.
Material transfer from rubber, felt, plastic, or glides
Material transfer from rubber, felt, plastic, or glides can contribute to floor marks through transfer, abrasion, adhesive exposure, or friction. Protector material influences how the contact surface behaves under pressure and movement, but marking risk also depends on floor type, floor finish, dirt, pressure, and movement. Material effects can vary by floor compatibility and surface condition.
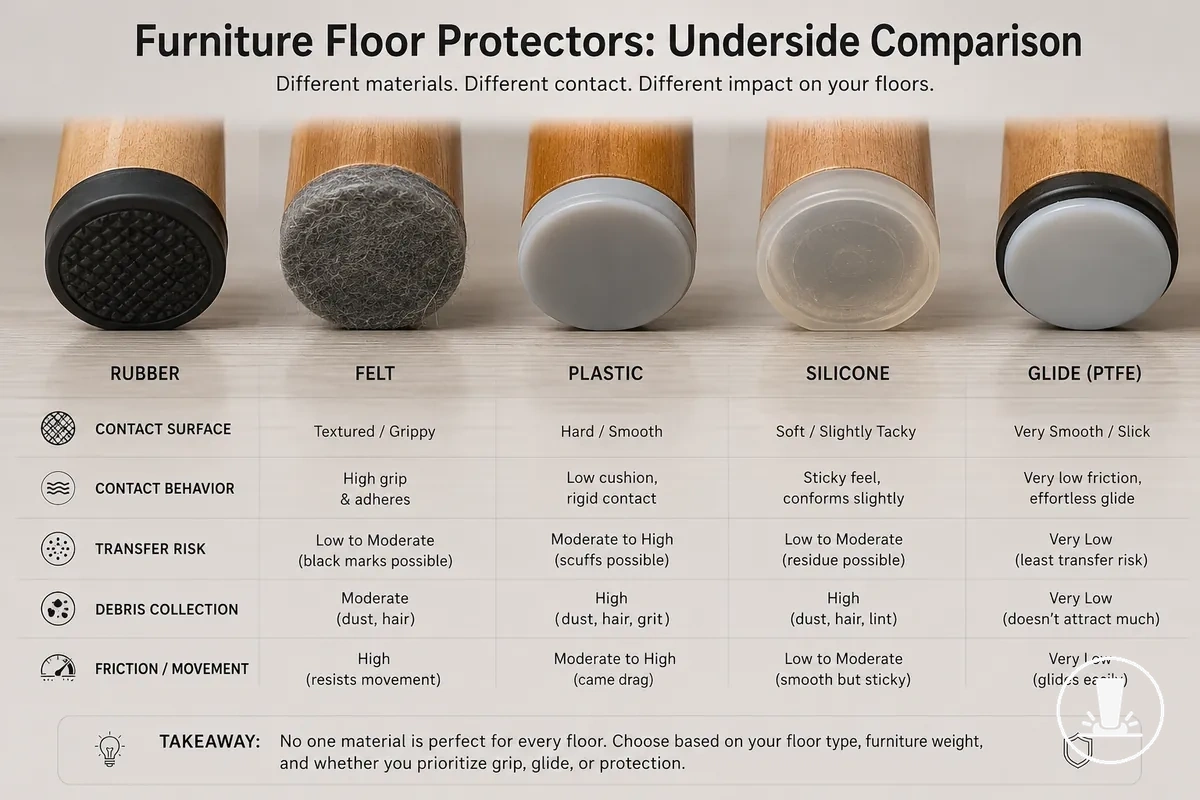
Contact behavior is the key attribute that influences how a protector material interacts with a floor surface. Rubber may increase grip behavior, felt may collect debris, plastic and glides may create friction-related contact effects, and silicone may present a different residue risk profile depending on the floor finish. Material transfer, discoloration, scuffing, and adhesive exposure can result from different contact behaviors rather than from the material alone. For a broader comparison of protector construction and performance characteristics, see floor protector materials.
Material transfer from rubber, felt, plastic, or glides is easier to evaluate when contact surfaces are compared side by side. The image below compares contact surfaces that can influence transfer risk, debris collection, and friction-related mark behavior.
Protector material should be evaluated through contact surface, residue risk, grip behavior, and floor compatibility. The table below follows material → contact behavior → possible mark type → safer use condition logic and focuses on mark mechanisms rather than material selection.
| Material | Contact behavior | Possible mark type | Safer condition |
|---|---|---|---|
| Rubber | Higher grip behavior on some surfaces | Transfer marks or discoloration may occur | When floor compatibility is suitable and the contact surface remains clean |
| Felt | Can collect debris within fibers | Abrasion-related marks may develop when debris accumulates | When debris collection is managed and adhesive exposure is limited |
| Plastic | Direct contact with limited cushioning | Scuffing may occur under friction and movement | When the contact surface remains smooth and clean |
| Silicone | Flexible contact surface with variable grip behavior | Residue risk or transfer marks may vary by floor finish | When floor compatibility is checked first |
| Glides | Designed for sliding contact | Friction-related marks may appear if debris is present | When the sliding path and contact surface remain clean |
No protector material is universally non-marking because mark mechanisms depend on floor finish, contact conditions, movement, pressure, and maintenance. Material transfer should be evaluated through contact behavior rather than by assuming a material is safe or unsafe in every situation. For a focused contrast between two common material types, see felt vs rubber protectors.
When rubber pads can stain or scuff floors
Rubber pads can stain, scuff, or leave discoloration when compound type, floor finish sensitivity, heat, moisture, or pressure creates material transfer or a surface reaction. Rubber pads can also leave transfer marks or grip marks under certain contact conditions. Whether a visible mark develops depends on the floor finish and the conditions at the contact surface.
Mark risk varies because rubber behavior differs by product and surface. Rubber softness, color, additives, trapped moisture, and furniture load can influence whether transfer marks, dark marks, or scuffs appear. Rubber transfer differs from adhesive residue and dirt abrasion because the mark mechanism is linked to the rubber contact surface rather than exposed adhesive or trapped debris. The checklist below highlights common risk variables.
- Compound type may influence whether material transfer or discoloration occurs.
- Rubber softness and additives can affect contact behavior under pressure.
- Rubber color can affect the visibility of transfer marks on lighter floor surfaces.
- Floor finish sensitivity may increase the chance of a surface reaction.
- Heat and trapped moisture can change contact conditions and may increase mark risk.
- Furniture load can increase grip marks or scuff formation at the contact point.
Rubber pads are not universally unsafe, and not all rubber pads stain floors. Mark formation depends on how compound type, floor finish, heat, moisture, pressure, and contact conditions interact at the surface. Evaluating these factors together provides a more reliable explanation than assuming the material alone causes every mark.
When felt pads collect debris or leave adhesive marks
Felt pads usually leave marks when debris collection, worn fibers, compressed edges, pad shift, or adhesive exposure changes the contact surface. Dirty felt can trap dust and grit, while worn fibers can reduce cushioning and increase friction. Clean felt is different from failing felt, and whether a mark appears depends on felt condition and floor contact.
Chair movement can make felt-pad issues easier to notice because repeated motion increases friction and may affect pad alignment over time. When a felt furniture pad shifts, an adhesive edge can become exposed and leave adhesive marks near the leg footprint. For example, grit trapped in felt fibers can create dark arcs or trails when chair movement repeatedly drags the same contact point across the floor. The signs below highlight common felt-pad failure patterns.
- Debris collection within felt fibers can create a rougher contact surface.
- Worn fibers may reduce cushioning and increase friction at the contact point.
- Compressed edges can concentrate pressure in a smaller area.
- Pad alignment problems may expose part of the furniture leg or adhesive edge.
- Adhesive marks can appear when an adhesive edge becomes exposed after pad shift.
- Low cleaning frequency may allow dust and grit to accumulate within the felt surface.
Felt pads do not automatically mark floors, but fiber condition, adhesive exposure, debris collection, and repeated chair movement can increase mark risk under certain conditions. Felt-specific marks are often linked to changes in felt thickness, contact alignment, or surface condition rather than to clean felt alone.
Floor and finish conditions that increase marking risk
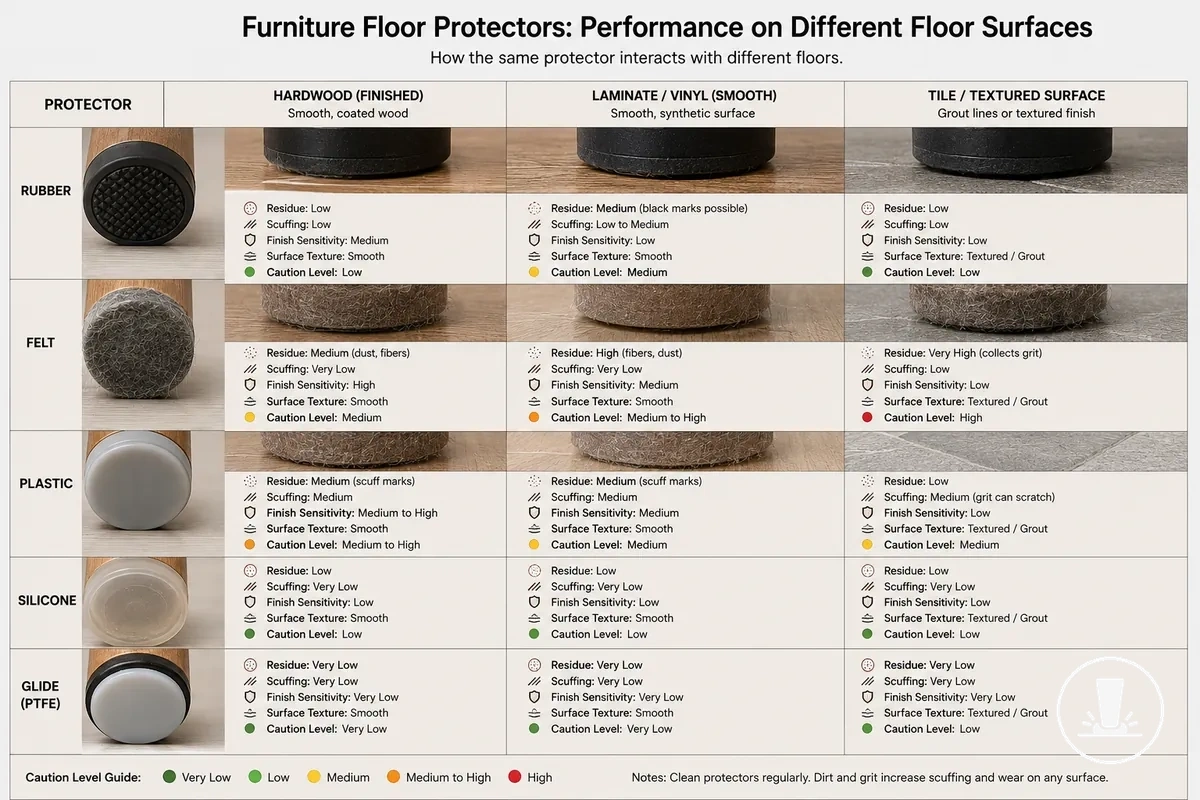
Floor conditions and finish conditions change marking risk because they influence how residue, scuffing, staining, and pressure marks appear on a floor surface. The same protector can behave differently on hardwood, laminate, vinyl, tile, or other finished surfaces. Specific outcomes depend on floor finish characteristics, finish hardness, seal condition, and overall surface condition rather than on a single rule for every manufacturer finish.
Finish sensitivity refers to how a floor finish responds to contact, friction, moisture, and cleaning. Surface texture can change mark visibility because smooth surfaces may reveal residue differently than textured surfaces that retain grit. Hardwood surfaces may require closer attention to finish sensitivity and seal condition, while laminate, vinyl, and tile can present different combinations of moisture sensitivity, chemical sensitivity, and cleaning tolerance. These criteria help explain why surface-specific evaluation matters when choosing or assessing hardwood floor protectors.
Floor and finish conditions that increase marking risk are easier to compare when surface characteristics are viewed side by side. The image below compares surface conditions that can change mark behavior and influence finish sensitivity.
The table below organizes floor surface, finish sensitivity, likely mark behavior, and caution level so compatibility risk can be evaluated through floor and finish conditions rather than assumptions.
| Floor or finish condition | Why mark risk changes | Likely mark behavior | Safer check |
|---|---|---|---|
| Hardwood with finish sensitivity | Finish hardness and residue visibility may vary | Residue or pressure marks may appear more noticeable | Inspect floor finish and seal condition |
| Laminate with smooth surface texture | Scuffing may be easier to see on uniform surfaces | Light scuffs or drag marks may become more visible | Evaluate cleaning tolerance first |
| Vinyl with moisture sensitivity | Moisture and chemical sensitivity can affect appearance | Staining or discoloration may appear under certain conditions | Use a small test area before stronger cleaners |
| Tile with textured surface | Texture can retain grit and increase abrasion potential | Debris-related marks may collect along contact paths | Check for trapped particles at contact points |
| Worn seal condition | Reduced surface protection can change risk outcome | Mark visibility may increase | Assess finish condition before removal attempts |
A common myth is that one cleaner or one compatibility rule applies to every floor finish. In practice, floor conditions and finish conditions can respond differently based on surface texture, moisture sensitivity, chemical sensitivity, and cleaning tolerance. When finish damage is uncertain, use conservative testing before strong cleaning methods or abrasive removal attempts.
How to remove furniture pad marks safely
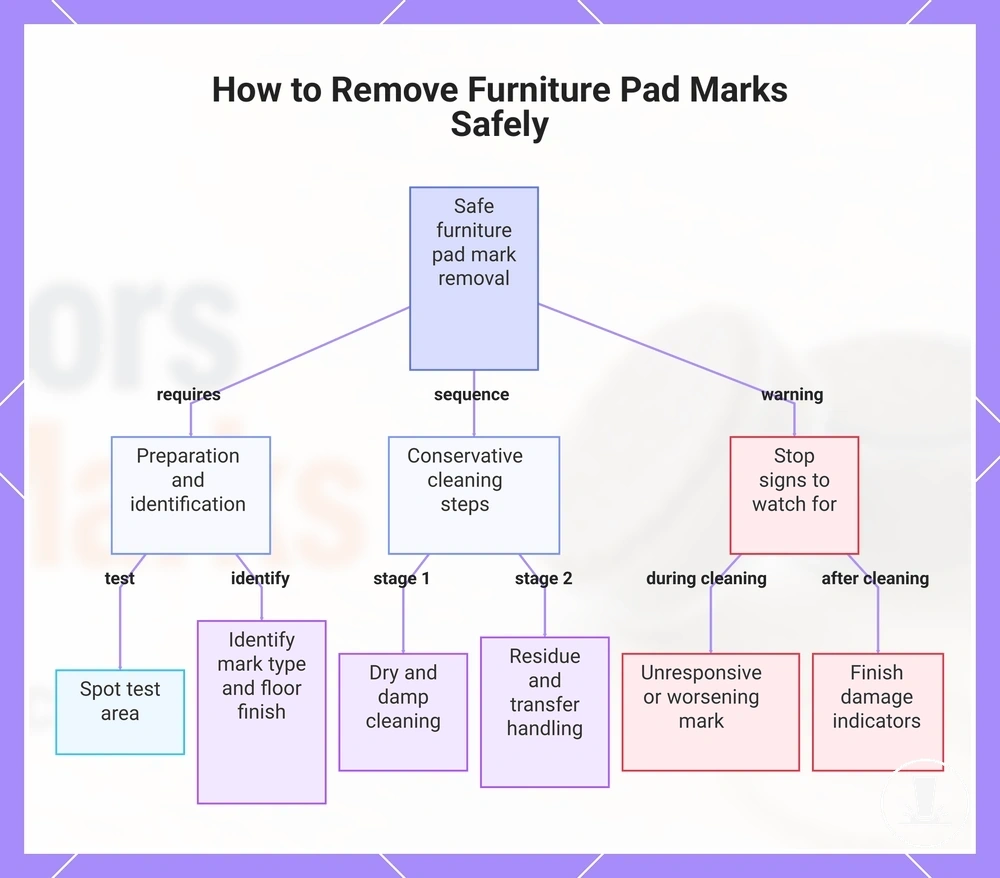
To remove furniture pad marks safely, start with the mildest suitable method and match the cleaning approach to the mark type. Residue, transfer, scuffing, and possible finish damage can respond differently to cleaning. The safest furniture pad mark removal method depends on both the mark type and the floor finish.
Furniture pad mark removal should begin with spot testing before broader cleaning is attempted. Spot testing can help reveal whether a floor finish reacts to damp cleaning or whether a mark changes unexpectedly. Persistent dull patches, color change, or sticky finish behavior are important stop signs because they may indicate finish damage rather than a removable surface mark. Use the steps below only after identifying the likely mark type and floor finish.
The sequence below follows a conservative approach based on mark response rather than aggressive escalation. Each step includes an action, a condition, and a stop signal to help avoid unnecessary surface risk.
- Dry cleaning: If loose dirt, dust, or debris is present, use dry cleaning with a clean cloth. Stop if the mark remains unchanged and does not appear related to surface debris.
- Damp cleaning: If the mark appears to be light residue, use a slightly damp cloth with gentle cleaning pressure. Stop if dullness, color change, or unusual floor-finish behavior appears.
- Residue softening: If residue remains after damp cleaning, use limited moisture contact to help lift residue before wiping again. Stop if the mark does not respond or if the floor finish appears affected.
- Evaluate transfer or scuffing: If transfer or scuffing is suspected, use cautious cleaning only after spot testing a small area. Stop if the mark spreads, darkens, or becomes more noticeable.
- Check finish-safe stopping points: If persistent dull patches, color change, or sticky finish behavior remain after gentle cleaning, treat them as stop signs. Further scrubbing may not improve the result and may require floor-specific guidance instead of continued escalation.
Furniture pad mark removal does not follow a universal formula because cleaning response varies by mark type and floor finish. Residue may respond to gentle cleaning, while transfer, scuffing, or finish damage can require different handling. When stop signs appear, cautious evaluation is usually preferable to repeated cleaning attempts.
This chart shows the safe steps to remove furniture pad marks, including preparation, cleaning sequence, and key stop signs to avoid damaging the floor finish.
Cleaning removable surface residue
Removable surface residue should be loosened gently, tested in a small area, and lifted without scraping. Removable surface residue can come from adhesive film, dust buildup, or light material transfer on the floor surface. Use a spot test first to confirm that the cleaning approach is suitable for the floor finish.
Adhesive film, dust buildup, and light material transfer may respond to gentle cleaning when the residue remains on the surface. Follow the short steps below and stop if the residue does not lift easily because the mark may involve finish interaction.
- Use a soft cloth to remove loose dust buildup and assess whether the mark is removable surface residue.
- Perform a spot test with minimal moisture in a small area before wider cleaning.
- If needed, use a mild cleaner that may be compatible with the floor finish and apply it with a soft cloth.
- Lift residue with gentle wiping, allow drying, and complete a post-clean inspection.
- Stop if the residue remains difficult to lift or if the surface appearance changes during cleaning.
Handling marks that may involve the floor finish
Floor finish involvement may be possible when dullness, color change, swelling, a soft finish, or a mark that remains after mild cleaning is present. These signs can indicate finish-related marks rather than removable surface residue, although appearance alone cannot confirm a finish reaction. Stop escalation when these conditions appear because additional cleaning may not clarify the cause.
Finish-related marks often need slower and less abrasive handling because visual change, texture change, and cleaning response can be difficult to interpret. Use the caution checklist below to identify signals that may justify a more careful approach. This page can identify protector-related risk, but it should not replace a floor-specific repair assessment when finish type uncertainty remains.
- Dullness or a dull patch remains after mild cleaning and acts as a stop signal.
- Color change differs from surrounding areas and may indicate a finish reaction.
- Swelling or a soft finish changes the surface texture and warrants caution.
- A persistent mark shows little response to mild cleaning despite careful handling.
- Texture change becomes more noticeable after repeated protector pressure or long-term contact.
- Floor age and finish type uncertainty can make finish involvement harder to assess.
When marked protectors should be cleaned or replaced
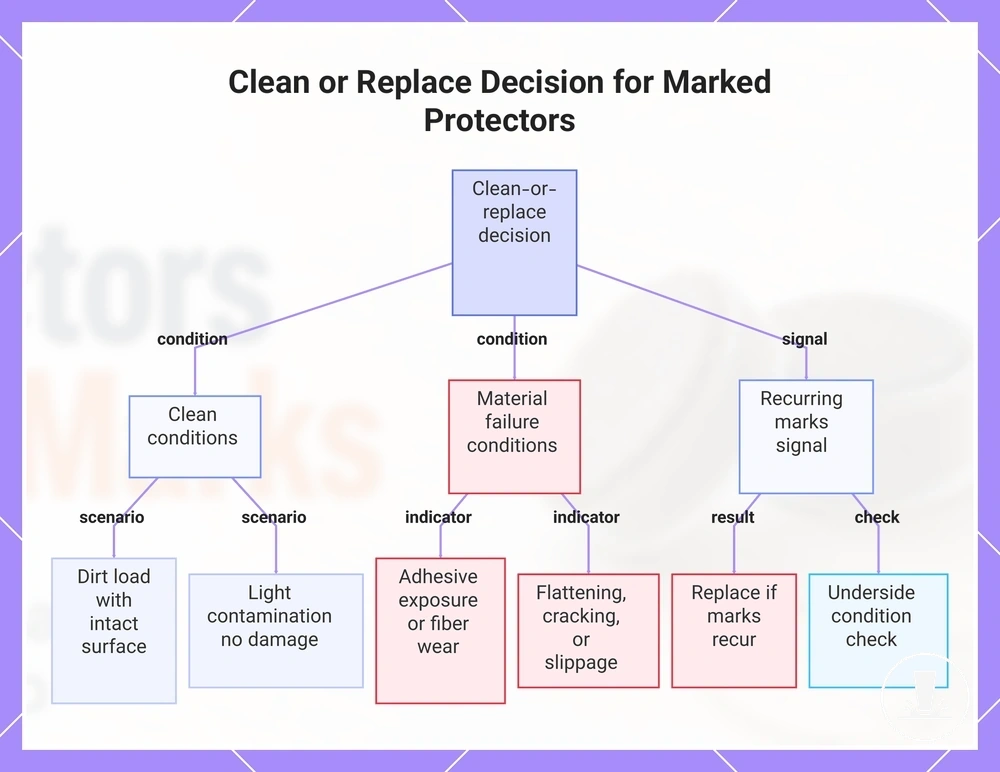
Marked protectors should be cleaned when dirt load is the main issue and replaced when the contact surface, adhesive, shape, or material condition is failing. Marked protectors can remain usable when cleaning restores the contact surface, but a recurring mark source often indicates a condition problem that cleaning alone may not resolve. Mark recurrence is the key signal when deciding whether protectors should be cleaned or replaced.
Marked protectors should be evaluated through underside condition before a maintenance decision is made. Dirt load, debris buildup, and surface contamination may support cleaning when the contact surface remains intact and reusable. Adhesive exposure, fiber wear, flattening, cracking, and slippage can indicate contact failure that changes how the protector interacts with the floor. The checklist below helps connect protector condition to a clean-or-replace decision.
A cleanable rubber or silicone contact surface may remain reusable when dirt load is the primary cause of marks and the material condition remains stable. By contrast, worn adhesive felt with fiber wear, adhesive exposure, or a worn contact surface may continue creating repeated marks after cleaning. The decision depends on underside condition, worn material, and mark recurrence rather than protector type alone.
- Dirt load with an intact contact surface: Clean when debris buildup appears to be the main cause of marks.
- Light surface contamination with no material damage: Clean when the protector remains stable and reusable.
- Adhesive exposure at the contact point: Replace because exposed adhesive indicates a failing adhesive condition.
- Fiber wear that affects floor contact: Replace when worn material continues to contribute to repeated marks.
- Flattening or cracking of the contact surface: Replace because contact failure is present.
- Slippage during normal furniture movement: Replace when protector stability can no longer be maintained.
- Repeated marks after cleaning: Replace when a recurring mark source remains despite a clean underside condition.
This chart shows the conditions for cleaning or replacing marked protectors based on dirt load, material condition, and mark recurrence.
How to prevent new marks with floor safe protectors
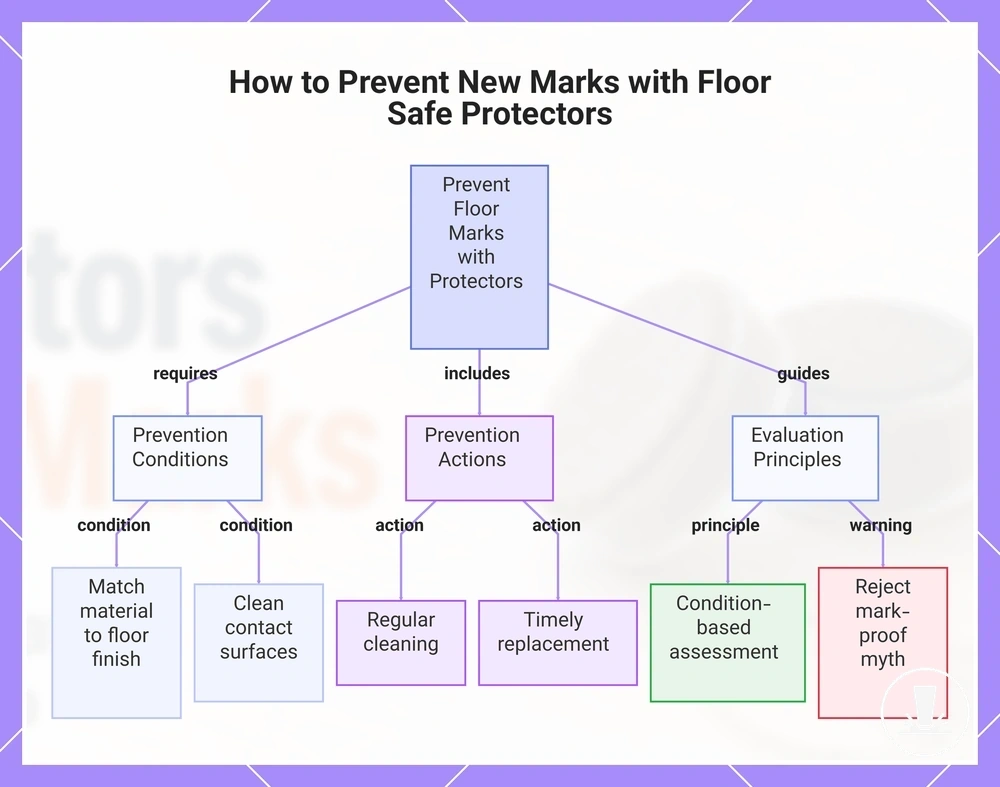
When furniture protectors leave marks, preventing new marks depends on matching material choice to the floor finish, keeping contact surfaces clean, checking wear, and using appropriate replacement timing before residue transfer or contact failure develops. Floor safe protectors work best when cleanliness, fit, and condition are monitored together rather than treated as a one-time solution. Mark prevention depends on floor finish, furniture movement, and protector condition.
Diagnosed causes are most useful when they are connected to prevention habits. Dirt buildup points toward regular cleaning frequency, while adhesive exposure, worn pads, or contact failure point toward replacement timing. Material transfer concerns often require closer attention to material choice and floor finish compatibility. The checklist below connects common risk conditions to practical prevention actions.
- Material choice and floor finish: Match floor safe protectors to the floor surface because material behavior can vary by finish type.
- Dirty contact surfaces: Maintain cleaning frequency when dirt buildup is present because trapped debris can increase mark risk.
- Incorrect pad size: Use a pad size that supports stable contact because concentrated pressure may increase visible marking.
- Frequent furniture movement: Check contact surfaces more often when chairs or furniture move regularly.
- Adhesive exposure: Replace worn pads when adhesive becomes exposed because residue transfer can become a recurring issue.
- Flattening, cracking, or slippage: Use replacement timing as a prevention habit when contact failure is visible.
- Repeated marks after cleaning: Reassess protector condition because recurring marks may indicate worn material rather than surface dirt.
- Uncertain floor response: Use spot testing before broader cleaning or maintenance actions.
A non-marking claim should be treated as a condition-based statement rather than a universal outcome. Spot testing can help identify how a floor finish responds before broader use, especially when floor condition, material choice, or prior mark history is uncertain. Safer protectors are selected through evaluation criteria rather than assumptions.
A common myth is that a protector can be mark-proof in every situation. The more accurate view is that floor safe protectors reduce mark risk when material choice, pad size, contact surfaces, cleaning frequency, and replacement timing are managed together. Once the causes of marks are understood, protector selection becomes a criteria-based decision rather than a troubleshooting guess.
This chart shows the key prevention conditions, actions, and evaluation principles for reducing floor marks using floor safe protectors.